再话tcpcopy的胞弟gryphon
gryphon是由网易研发,能够模拟千万级别并发用户进行压力测试的一个软件,可用于网络消息推送服务方面的压力测试和传统web服务的压力测试。目前由网易的 王斌进行维护。更多介绍可参见A powerful tool to simulate millions of concurrent users for loading testing
gryphon的安装和使用方法分为传统架构方式和高级架构方式。
相关角色说明
- gryphon客户端(/usr/local/bin/gryphon)
- intercept拦截进程(/usr/local/bin/intercept)
测试时,gryphon客户端读取录制的pcap文件(可以通过tcpdump产生),通过Raw Socket修改请求并发送到测试机。因为这些请求的来源ip可能是模拟的,为了连接的正常关闭,需要拦截测试机的响应包。
在传统架构下:
1 netfilter-iptables在协议栈将数据包交给内核中的ip_queue模块
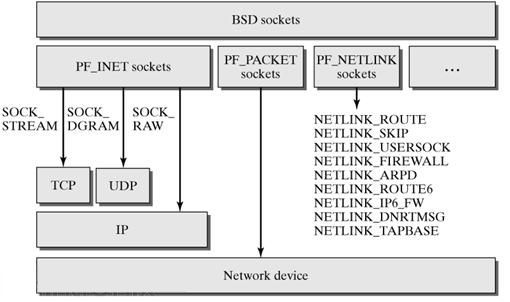
2 intercept在用户态通过netlink socket接收内核传来的数据报文
3 将处理后的报文以及对报文的处理意见(ACCEPT,DROP等)传递给内核协议栈
1 2 3 4 5 6 7 8 9 10 11 12 | |
1 2 3 4 5 6 7 8 9 10 11 12 13 14 15 16 17 18 19 20 21 22 23 24 25 26 27 28 29 30 31 32 33 34 35 36 37 38 39 40 41 42 | |
在高级架构下,是通过在测试机上配置静态路由规则,将响应路由到辅助服务器进行处理。

传统架构下安装并使用
在传统架构下,intercept拦截进程需要运行在测试机上,用于拦截测试机的响应包。
安装与使用
在测试机安装intercept拦截进程
git clone git://github.com/wangbin579/tcpcopy.git
cd tcpcopy
sh autogen.sh
./configure --prefix=/usr/local/tcocopy --enable-single
make
sudo make install
安装gryphon客户端
git clone git://github.com/wangbin579/gryphon.git
cd gryphon
sh autogen.sh
./configure --prefix=/usr/local/gryphon --enable-single
make
sudo make install
使用方法
以intercept拦截进程安装在测试机10.16.15.118,应用端口是80,gryphon客户端安装在10.16.15.117为例,说明gryphon在传统架构下的基本使用方法。
- tcpdump抓包录制pcap文件
可以在线上服务器抓包录制,并拷贝到gryphon客户端所在的服务器10.16.15.117
tcpdump -i eth0 port 80 -s 0 -w xxx.pcap
- 拦截响应包
在测试机10.16.15.118上操作
modprobe ip_queue
iptables -I OUTPUT -p tcp --sport 80 -j QUEUE
/usr/local/tcpcopy/bin/intercept
如果内核版本3.5,可以使用nfqueue
- 发送测试请求
在gryphon客户端所在服务器10.16.15.117上操作
/usr/local/gryphon/bin/gryphon -x 80-10.16.15.118:80 -f ./xxx.pcap -s 10.16.15.118 -u 1000 -a 2 -c 10.17.15.*
上述命令,从xxx.pcap抓包文件中提取出访问80端口的用户会话过程,模拟1000个用户,将请求复制到测试机10.16.15.118的80端口中去。其中用户ip地址的范围是10.17.15.*。
-a参数用于加快数据包的发送速度。-a 2代表将数据包之间的发送间隔缩短一半,相当于加速2倍。也可和-i配合,如 -a 10 -i 2048
gryphon拦截进程中各个基本参数的释义如下:
gryphon -x historyServerPort-targetServerIP:targetServerPort -f -s -u -c
调试步骤
gryphon客户端和intercept拦截进程运行时,会在当前工作目录生成error_gryphon.log,error_intercept.log日志文件,里面有相关运行信息。当测试过程不能正常工作时,可优先查看相关日志。
其次就是在测试机或者gryphon客户端所在的服务器上进行抓包。确保gryphon客户端发出请求,并且没有收到测试机的响应包,如:

高级架构下安装并使用
在高级架构下,intercept拦截进程需要运行在辅助服务上,用于拦截测试机的响应包。
安装与使用
在测试机安装intercept拦截进程
git clone git://github.com/wangbin579/tcpcopy.git
cd tcpcopy
sh autogen.sh
./configure --prefix=/usr/local/adv-tcpcopy --enable-single  --enable-pcap --enable-advanced
make
sudo make install
安装gryphon客户端
git clone git://github.com/wangbin579/gryphon.git
cd gryphon
sh autogen.sh
./configure --prefix=/usr/local/adv-gryphon --enable-single --enable-advanced
make
sudo make install
使用方法
以intercept拦截进程安装在辅助服务器10.16.15.116,gryphon客户端安装在10.16.15.117,测试机10.16.15.118的应用端口是80为例,说明gryphon在高级架构下的使用方法。
- tcpdump抓包录制pcap文件
可以在线上服务器抓包录制,并拷贝到gryphon客户端所在的服务器10.16.15.117
tcpdump -i eth0 port 80 -s 0 -w xxx.pcap
- 拦截响应包
在测试机10.16.15.118上设置静态路由,将响应包路由到辅助服务器10.16.15.116
route add -net 10.17.15.0 netmask 255.255.255.0 gw 10.16.15.116
查看是否设置成功
$ route
Kernel IP routing table
Destination     Gateway         Genmask         Flags Metric Ref    Use Iface
10.17.15.0      10.16.15.116    255.255.255.0   UG    0      0        0 eth0
10.16.14.0      *               255.255.254.0   U     0      0        0 eth0
169.254.0.0     *               255.255.0.0     U     0      0        0 eth0
default         10.16.14.1      0.0.0.0         UG    0      0        0 eth0
如果设置错了,可以删除并重新添加
route del -net 10.17.15.0 netmask 255.255.255.0
在辅助服务器10.16.15.116上启动intercept拦截进程
/usr/local/adv-tcpcopy/bin/intercept -F 'tcp and src port 80'
- 发送测试请求
在gryphon客户端所在服务器10.16.15.117上操作
/usr/local/adv-gryphon/bin/gryphon -x 80-10.16.15.118:80 -f ./xxx.pcap -s 10.16.15.116 -u 1000 -c 10.17.15.*
Reference
[^1] http://www.ibm.com/developerworks/cn/linux/l-ntflt/index.html
[^2] http://www.ibm.com/developerworks/cn/linux/l-netlink/index.html
[^3] http://www.tenouk.com/Module42a.html
[^4] http://blog.csdn.net/u010807313/article/details/9236581