[原]全面认识Depth - 这里有关于Depth的一切
链接:https://zhuanlan.zhihu.com/p/25095708
来源:知乎
著作权归作者所有。商业转载请联系作者获得授权,非商业转载请注明出处。
Depth的由来
从PerspectiveProjection 说起
所谓的PerspectiveProjection 其实就是将顶点从view 坐标系下,转换到NDC下
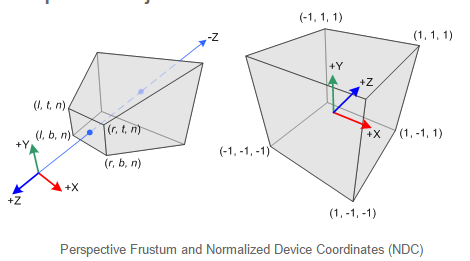
这里面包含了两个步骤,将view 坐标系下的顶点乘以透视矩阵,转换到Clip 坐标系,得到Clip坐标,
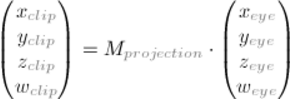
然后统一除以w,得到NDC 坐标。

透视矩阵就不推导了,
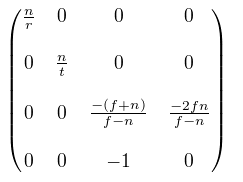
这里再看下Zn和Ze之间的关系
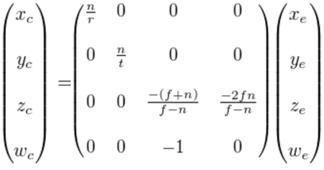
其中n是近裁面,f是远裁面,r是0.5 *width, t = .5 * height。其中

可以得出

其中A = -(f+n)/(f-n) , B = -2fn/(f-n).两者的关系可以用下图来表示

可以看出有下面几点
- 两者是非线性的关系。曲线是倒数的关系。(y=1/x)
- 根据曲线的特点可以知道在近裁面附近的Depth变化非常的明显,越接近远裁面,Depth变化越小,精度变差,这时候就会出现恼人的Z-Fighting
- 要避免Z-Fighting,n和f之间的距离就要尽量小,尽量将n大一些。
- 这样的好处虽然远的地方可能会有Z-fighting,但是近处的地方有了更好的深度精度
可能这还不是很清楚,后面还有更精确的数学推导。
viewporttransformation
viewport transformation都知道,就是将ndc坐标map到屏幕空间,那么深度呢?从[-1,1]映射到[0,1],(OpenGL中)。0是最近,1是最远. 默认Dw的值在[0,1]就是可以渲的,当然,也可以用 glDepthRange可以用来指定Zw的取值范围。
viewport transformation 的计算过程如下
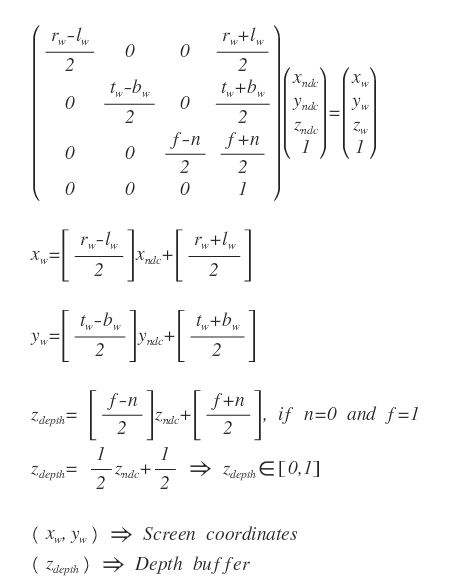
将之前计算的Zndc的式子代进来,得到
Zdepth = (We / Ze) * f*n/(f-n) + 0.5 *(f+n)/(f-n) + 0.5
在存储到depth buffder 的时候,需要将Zw乘以一个系数s = (2^n -1) ,其中n是Depth buffer的位数。
所以最终Depthbuff中存储的是
Zw = s * [ (we / ze) *f*n/(f-n) + 0.5 * (f+n)/(f-n) + 0.5 ]
下面推导一下关于Depth精度的问题。
将上面的式子进行变换,吧Ze放到左边
Ze / we = f*n/(f-n) / ((zw / s) - 0.5 * (f+n)/(f-n) - 0.5)
= f * n /((Zw / s) * (f-n) -0.5 * (f+n) - 0.5 * (f-n))
= f * n /((Zw / s) * (f-n) - f)
假设是一个16位的深度缓冲,n = 0.01,f = 1000,那么s = 65535
对于从Depth Buff采出来的值
Zw = 0 ,则 Ze/We = -n= -0.01
Zw = s = 65535,则Ze/We= -f =-1000
接下来去Zw = 1和s-1看看
Zw = 1 => Ze /We = -0.01000015
Zw = s-1 =>Ze/ We = -395.90054
仔细观察上面的数据,发现了一个惊天秘密 –eye坐标系下的深度Ze,从-395.9到-1000在Depth buffder中所对应的范围是[65535, 65536],这是相当恐怖的,导致的结果就是Z-Fighting,下面就是在Fighting。
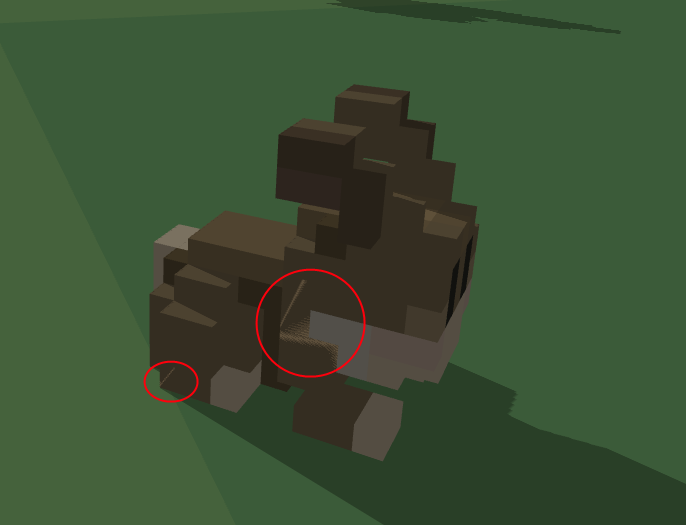
对于深度造成的误差,还可以参考这一篇Learningto Love your Z中的例子。
由深度缓冲重建view pos
知道一个点的深度还有相机的一些参数,重新算出物体的坐标(不管是世界坐标还是view坐标系下的坐标),微软的kinect利用的就是这个原理,进行三维重建的。
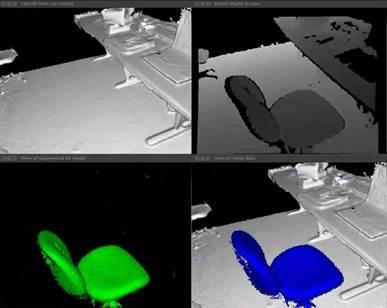
在Deferred shading还有很多后期效果中,我们都需要一个像素点精确的位置来给这个像素着色。
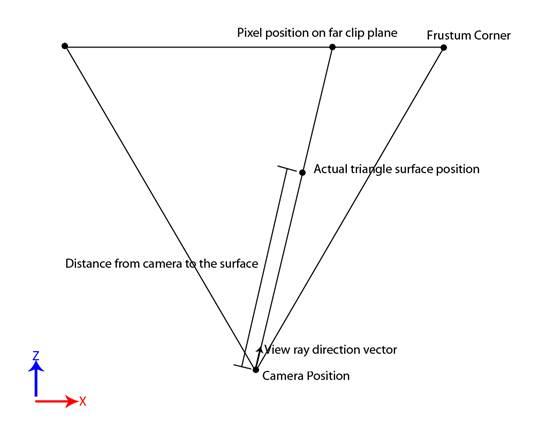
如上图所示,已知Camera的pos,view Dir,只需要知道surface上的点到Camera的直线距离t就可以求出了: Peye= Pcam + t*Dview。
现在问题是t怎么来。
一种处理方法是将在GBuffer Pass中将t存放在一个rt里,具体的流程如下
1. 在GBuffer pass,计算camera到surface的距离,存到rt里面。
2. 在Light Pass的VS中,计算vertex到camera位置的View Ray向量。
3. 在PS中,将View Ray 单位化,得到Dview。
4. 采样rt获取Camera到Surface Pos的距离t
5. Peye = Pcam + t*Dview。
简化的Shader如下
// G-Buffer vertex shader

// Calculate view space position of the vertex and pass it to the pixel shader

output.PositionVS = mul(input.PositionOS, WorldViewMatrix).xyz;
// G-Buffer pixel shader

// Calculate the length of the view space position to get the distance from camera->surface

output.Distance.x = length(input.PositionVS);
// Light vertex shader

#if PointLight || SpotLight

// Calculate the world space position for a light volume

float3 positionWS = mul(input.PositionOS, WorldMatrix);

#elif DirectionalLight

// Calculate the world space position for a full-screen quad (assume input vertex coordinates are in [-1,1] post-projection space)

float3 positionWS = mul(input.PositionOS, InvViewProjMatrix);

#endif

// Calculate the view ray

output.ViewRay = positionWS - CameraPositionWS;
// Light Pixel shader

// Normalize the view ray, and apply the original distance to reconstruct position

float3 viewRay = normalize(input.ViewRay);

float viewDistance = DistanceTexture.Sample(PointSampler, texCoord);

float3 positionWS = CameraPositionWS + viewRay * viewDistance;
但是还有优化的空间,上面提到的这种做法的缺点是浪费了显存和带宽,而Depth 就在BackBuffer,如果能够从Depth中得到view pos的话,优化又进了一步。
由于硬件中的Depth Buffer是除以过w的,所以
第一步要做的就是将Depth buffer中的值恢复到view 坐标系下的Depth,就叫Ze,
由上面推导的结果
Zdepth = (We / Ze) * f*n/(f-n) + 0.5 * (f+n)/(f-n) + 0.5
通过f和n就可以推算出Ze了。
另一种方法是利用透视矩阵M,根据透视变换

其中Zndc =2 * depth – 1.原理是一样的。
没线性化之后的深度渲染出来是这样的(狮子的鼻子),稍微远一些的地方深度值都很接近1了,所以很白,只有很近的地方才有灰色的部分。

将线性化之后的depth渲染出来
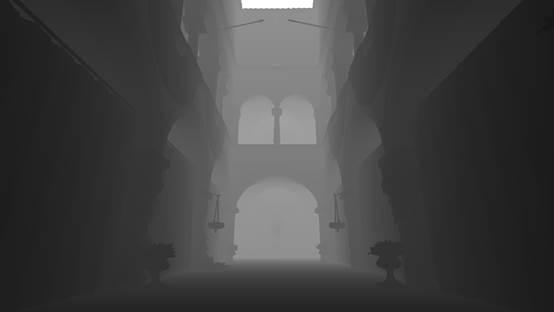
不是一片白了。
知道深度之后,通过相似三角形就可以求出
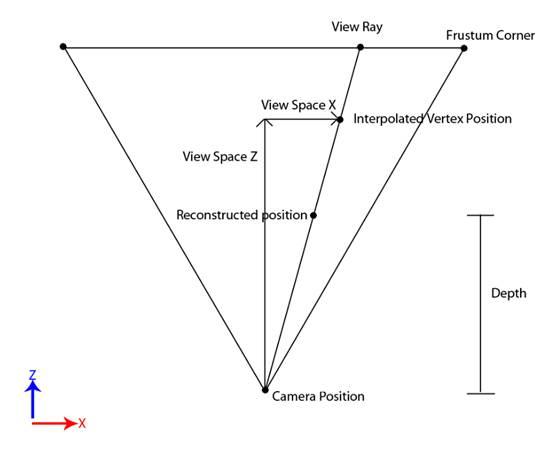
接下来就是求View ray,这个放在ps中做,
ViewRay = float3(positionVS.xy / positionVS.z, 1.0f);
如果要将view坐标系的坐标转换到世界坐标系,

还有一种简单暴力的处理方法
vec3 DepthToPos(float depth, vec2 texCoord)

{

vec4 ndcspace = vec4(texCoord.x * 2.0 - 1.0, texCoord.y * 2.0 - 1.0, depth * 2.0 - 1.0, 1.0);

vec4 temp = inverse(MatView) * inverse(MatProj) * ndcspace;

return temp.xyz / temp.w;

}
直接用矩阵来处理,性能稍微会差一些(待考究)。
参考
Learning to Love your Z-buffer.