用 NextCloud 搭建个人私有云
去落格博客阅读完整排版的用 NextCloud 搭建个人私有云
背景交代
之前给大家写了一篇 用 ownCloud 搭建个人私有云 的文章,直到现在网盘纷纷停止服务已经有一段时间了,现在 ownCloud 的团队也弃坑了,全都跳槽去开发一个新的网盘”NextCloud“。
ownCloud 的版本号一直维持在
v9.x.x,然而 Nextcloud 作为一个新生儿,初始的版本就是
v10。这说明 Nextcloud 就是 ownCloud 的后续版本。目前 nextcloud 的最新版本是‘
12.0.0’。这个版本 BUG 稍微有点多,我本想等 12 稳定了再发教程,但是有人催我赶紧放教程,所以没办了,我就今天把教程发出来吧。
有人抱怨我上篇文章写的不明确,有很多东西都没有交代清楚,那我这篇文章尽量详细吧。如果还有哪写的不清楚,欢迎大家给提醒,我会尽量去改。那个,还有,如果有人希望也使用我的网盘,可以联系我,私人 QQ 269015385。
在这里吐个糟,我下面的教程是手动安装的教程。现在官网有一个一键安装,没错,只需要一个命令就行了,命令如下:
sudo snap install nextcloud
需要准备的清单
- X86架构主机:
或者是虚拟机也行,配置不用太高,推荐双核CPU、1GB以上内存,
我自己用的主机是4核i3 6100,8GB DDR4内存; - 域名:
推荐购买万网的域名,因为后面有一个章节会介绍到如果设置动态域名解析(DDNS); - 硬盘:
推荐单独准备一个硬盘用来存放数据,即使系统出现故障,你的数据也不会受到影响; - RAID卡:
如果可以使用 RAID 卡那就更好了,我自己使用的是 LSI 9266-4I,上面插了4个2TB硬盘,组 raid5。
操作系统
Ubuntu-server 16.04 x64
ps:有人管我要centos 的教程,我个人比较习惯用ubuntu ,其实也就是命令不一样而已。
主要软件
Apache2
PHP7
Mysql 5.7
工具清单
- VIM(一个 linux 的文本工具)
- Openssh-server(linux上的远程ssh服务,我比较喜欢用xshell远程上去配置)
- Filezilla(一个可以用过ssh管理主机文件的软件)
- unzip(解压东西用的,当然你可以用windows解压好,上传到linux)
操作用户
root
二、预配置
安装系统之前,我先对系统配置一下,以适应我的使用习惯。
- 更新
apt update
- 安装 vim
apt install vim
- 修改网卡名称为 eth0(选)
vim /etc/default/grub

//修改以下内容

GRUB_CMDLINE_LINUX=”net.ifnames=0 biosdevname=0”

sudo grub-mkconfig -o /boot/grub/grub.cfg

init 6
ps:这是我个人习惯,你也可以不改,设置静态也可以通过DHCP绑定一个,都行,看你习惯。
- 设置静态IP地址(选)
删除原文件
rm -r /etc/network/interfaces
vim /etc/network/interfaces

//写入以下内容

source /etc/network/interfaces.d/*

auto lo

iface lo inet loopback

auto eth0

iface eth0 inet static

address 192.168.88.250

netmask 255.255.255.0

gateway 192.168.88.1

dns-nameservers 114.114.114.114

init 6
ps:设置方法有很多种,可以自行搜索
- 配置ssh服务端(选)
apt install openssh-server
vim /etc/ssh/sshd_config

//修改以下内容

PermitRootLogin yes
ps:这个是通过远程登录到linux服务器ssh服务端,当然你也可以用真机的终端配置。
- 安装解压软件
apt install unzip
三、安装Apache2
首先先登录root账户
sudo su
- 安装环境
apt update

apt-get install apache2 libapache2-mod-php7.0

apt-get install php7.0-gd php7.0-json php7.0-mysql php7.0-curl php7.0-mbstring

apt-get install php7.0-intl php7.0-mcrypt php-imagick php7.0-xml php7.0-zip
- 安装NextCloud
https://nextcloud.com/install/#instructions-server
到这个页面查找当前的下载地址,下载NextCloud到root工作目录
cd

wget https://download.nextcloud.com/server/releases/nextcloud-12.0.0.zip
解压文件
unzip nextcloud-11.0.1.zip
复制到 Apache2 根目录
cp -rv nextcloud /var/www/
- 配置Apache2
创建子目录配置文件
vim /etc/apache2/sites-available/nextcloud.conf
写入以下内容
Alias /nextcloud "/var/www/nextcloud/"

<Directory /var/www/nextcloud/>

  Options +FollowSymlinks

  AllowOverride All

  Satisfy Any

 <IfModule mod_dav.c>

  Dav off

 </IfModule>

 SetEnv HOME /var/www/nextcloud

 SetEnv HTTP_HOME /var/www/nextcloud

</Directory>
链接子目录配置文件
ln -s /etc/apache2/sites-available/nextcloud.conf /etc/apache2/sites-enabled/nextcloud.conf
更改网站默认目录
vim /etc/apache2/sites-available/000-default.conf
修改以下内容
DocumentRoot /var/www/nextcloud
添加模块
a2enmod rewrite

a2enmod headers

a2enmod env

a2enmod dir

a2enmod mime
配置根目录权限
chown -R www-data:www-data /var/www/nextcloud/
创建详细配置脚本
vim script
写入以下内容
#!/bin/bash

ocpath='/var/www/nextcloud'

htuser='www-data'

htgroup='www-data'

rootuser='root'

printf "Creating possible missing Directories\n"

mkdir -p $ocpath/data

mkdir -p $ocpath/updater

printf "chmod Files and Directories\n"

find ${ocpath}/ -type f -print0 | xargs -0 chmod 0640

find ${ocpath}/ -type d -print0 | xargs -0 chmod 0750

printf "chown Directories\n"

chown -R ${rootuser}:${htgroup} ${ocpath}/

chown -R ${htuser}:${htgroup} ${ocpath}/apps/

chown -R ${htuser}:${htgroup} ${ocpath}/config/

chown -R ${htuser}:${htgroup} ${ocpath}/data/

chown -R ${htuser}:${htgroup} ${ocpath}/themes/

chown -R ${htuser}:${htgroup} ${ocpath}/updater/

chmod +x ${ocpath}/occ

printf "chmod/chown .htaccess\n"

if [ -f ${ocpath}/.htaccess ]

 then

  chmod 0644 ${ocpath}/.htaccess

  chown ${rootuser}:${htgroup} ${ocpath}/.htaccess

fi

if [ -f ${ocpath}/data/.htaccess ]

 then

  chmod 0644 ${ocpath}/data/.htaccess

  chown ${rootuser}:${htgroup} ${ocpath}/data/.htaccess

fi
运行脚本
chmod +x script

./script
重启服务
service apache2 restart
四、安装数据库
- 安装MySQL
apt-get install mysql-server mysql-client
ps:设置密码为空就行,下面会去设置密码
- 初始化安全配置
mysql_secure_installation
执行之后会进行如下操作
- 为root用户设置密码
- 删除匿名账号
- 取消root用户远程登录
- 删除test库和对test库的访问权限
- 刷新授权表使修改生效
[root@server1 ~]# mysql_secure_installation

NOTE: RUNNING ALL PARTS OF THIS SCRIPT IS RECOMMENDED FOR ALL MySQL

SERVERS IN PRODUCTION USE! PLEASE READ EACH STEP CAREFULLY!

In order to log into MySQL to secure it, we'll need the current

password for the root user. If you've just installed MySQL, and

you haven't set the root password yet, the password will be blank,

so you should just press enter here.

Enter current password for root (enter for none):<–初次运行直接回车

OK, successfully used password, moving on…

Setting the root password ensures that nobody can log into the MySQL

root user without the proper authorisation.

Set root password? [Y/n] <– 是否设置root用户密码,输入y并回车或直接回车

New password: <– 设置root用户的密码

Re-enter new password: <– 再输入一次你设置的密码

Password updated successfully!

Reloading privilege tables..

… Success!

By default, a MySQL installation has an anonymous user, allowing anyone

to log into MySQL without having to have a user account created for

them. This is intended only for testing, and to make the installation

go a bit smoother. You should remove them before moving into a

production environment.

Remove anonymous users? [Y/n] <– 是否删除匿名用户,生产环境建议删除,所以直接回车

… Success!

Normally, root should only be allowed to connect from 'localhost'. This

ensures that someone cannot guess at the root password from the network.

Disallow root login remotely? [Y/n] <–是否禁止root远程登录,根据自己的需求选择Y/n并回车,建议禁止

… Success!

By default, MySQL comes with a database named 'test' that anyone can

access. This is also intended only for testing, and should be removed

before moving into a production environment.

Remove test database and access to it? [Y/n] <– 是否删除test数据库,直接回车

- Dropping test database…

… Success!

- Removing privileges on test database…

… Success!

Reloading the privilege tables will ensure that all changes made so far

will take effect immediately.

Reload privilege tables now? [Y/n] <– 是否重新加载权限表,直接回车

… Success!

Cleaning up…

All done! If you've completed all of the above steps, your MySQL

installation should now be secure.

Thanks for using MySQL!
- 设置远程访问
解除绑定IP地址
vim /etc/mysql/my.cnf
找到
'bind-address = 127.0.0.1',删去这一行。
如果没有找到这行代码,那就:
vim /etc/mysql/mysql.conf.d/mysqld.cnf
找到
'bind-address = 127.0.0.1',删去这一行。
/etc/init.d/mysql restart
授权用户远程连接
先进入mysql client
mysql -u root -p
输入 root 用户的密码
把 password 替换成 root 用户的密码
grant all privileges on *.* to root@"%" identified by "password" with grant option;

flush privileges;
- 创建数据库
mysql -u root -p

create database nextcloud;

quit;
ps:创建一个数据库,名称是nextcloud,后面会 用到
- 数据库备份(选)
mysqldump -u 用户名 -p 数据库名 > 导出的文件名
例:
mysqldump -u dbadmin -p nextcloud> /var/database_bak.sql;ps:这个不是安装的必须步骤,这个是以后你想对数据库备份用的,下同
- 数据库还原(选)
mysql -u dbadmin -p

use nextcloud;

set names utf8;  #这里的字符集根你的将要导入的数据库的字符集一致。

source /var/database_bak.sql;
ps:这个不是安装的必须步骤
五、初始化 NextCloud
- 完成初始化
在浏览器输入
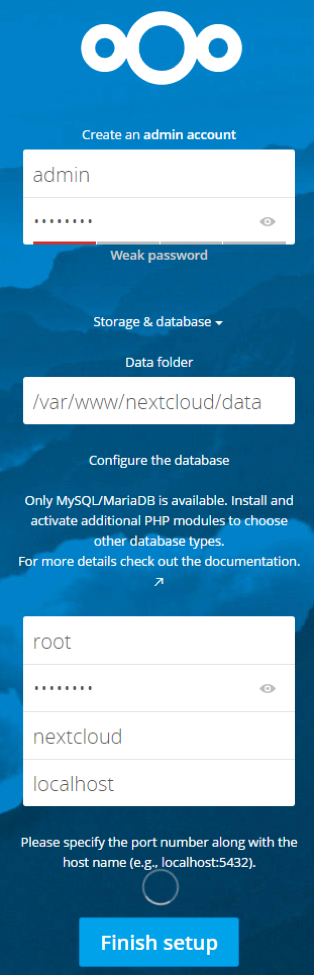
- 设置管理员账户
在第一行设置管理员的帐号
在第二行设置管理员的密码
- 存储和数据库设置
Data folder 设置网盘所有文件保存的位置,默认就好,后面会有更改的文章;
在下面依次输入:
- 数据库用户名(root)
- 数据库密码(你刚才设置的)
- 数据库名称(nextcloud,刚才写的是这个,除非你改了)
- 数据库地址(数据库的IP,如果是本机,可以写127.0.0.1,也可以写localhost)
存储和数据库设置
点击完成,稍等2分钟
六、修改存储路径(选)
- 停止web服务
service apache2 stop
- 修改配置文件
vim /var/www/nextcloud/config/config.php
找到
datadirectory项,把后面的
'/var/www/nextcloud/data'修改为你想要设置的路径,例:
'/var/data/'
- 转移数据
将
/var/www/nextcloud/data目录下的所有文件移动到新的
/var/data/目录下。
- 修改权限
修改
/var/data/目录所述的组及用户与原
/var/www/nextcloud/data目录相同,例如所述组和用户都修改为
www。
chown -R www-data:www-data /var/data

chmod 755 data
如果遇到“HTTP ERROR CODE 500”说明是chmod的问题
- 启动web服务
service apache2 start
七、修改apache端口(选)
- 编辑apache2的配置文件
vim /etc/apache2/sites-available/000-default.conf

把<VirtualHost *:80>改成<VirtualHost *:88>
- 编辑apache2的端口配置文件
vim /etc/apache2/ports.conf

把Listen 80改成Listen 88
- 重启apache服务
service apache2 restart
八、使用HTTPS加密我的流量
- 安装签名工具
apt install git

git clone https://github.com/Neilpang/acme.sh.git
cd ./acme.sh
./acme.sh --install
- 生成证书
因为现在国家通讯部的规定,运营商把所有的80端口都ban掉了。所以咱们申请证书不能使用正常的80端口进行申请证书,只能通过DNS解析的方法得到证书。
./acme.sh --issue --dns -d 你的域名.com
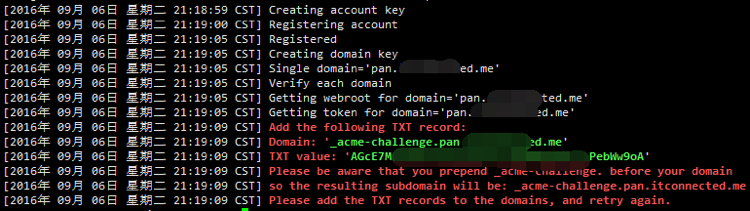
然后得到这张图,你需要去你的域名运营商的控制面板里,给你的域名加上你的二级域名,如果没有二级域名,那就直接添加一个txt类型的记录,主机记录填写Domain里的值,然后把TXT value里的值写到记录值里。
例图如下:

- 申请证书
./acme.sh --renew -d 你的域名.com
成功之后会出现这样的提示
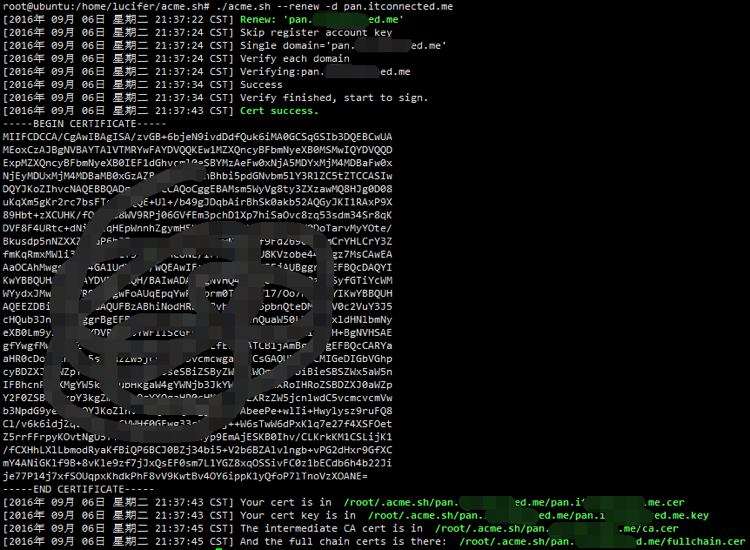
- 安装证书
然后现在咱们去配置把证书放到网站存放证书的文件夹,并把名字更正成它需要的名字
首先要看看存放证书的文件夹在什么地方,然后把证书复制过去
vim /etc/apache2/sites-available/default-ssl.conf
找到这2行
SSLCertificateFile      /etc/ssl/certs/ssl-cert-snakeoil.pem

SSLCertificateKeyFile   /etc/ssl/private/ssl-cert-snakeoil.key
然后把证书和私钥cp进去
cp /root/.acme.sh/pan.********ed.me/pan.********ed.me.cer /etc/ssl/certs/ssl-cert-snakeoil.pem

cp /root/.acme.sh/pan.********ed.me/pan.********ed.me.key /etc/ssl/private/ssl-cert-snakeoil.key
- 安装openssl
apt install openssl
- 开启SSL模块
a2enmod ssl
- 修改https的默认路径
vim /etc/apache2/sites-available/default-ssl.conf
改成下面值的
DocumentRoot /var/www/nextcloud
- 保存
按ESC
:wq
回车
启用https
上文安装完后,会在
/etc/apache2/sites-available/目录下生成一个缺省的
default-ssl文件。缺省的网页目录仍然是
/var/www/。我们可以创建一个链接到
site-enabled目录。
ln -s /etc/apache2/sites-available/default-ssl.conf /etc/apache2/sites-enabled/default-ssl.conf
重启apache服务:
service apache2 restart
九、万网的动态域名解析
- 安装 python
apt-get update

apt-get install python-pip

pip install requests
- 下载万网DDNS客户端
git clone https://github.com/rfancn/aliyun-ddns-client.git
- 复制路径
mv ./aliyun-ddns-client /opt/
- 修改配置文件
mv ddns.conf.example ddns.conf

vim ddns.conf
配置文件内容
[DEFAULT]

# access id obtains from aliyun

access_id=xxxxxxxxx【填写Access Key ID】

# access key obtains from aliyun

access_key=xxxxxxxxxxx【填写Access Key Secret】

# it is not used at this moment, you can just ignore it

interval=600

# turn on debug mode or not

debug=true


[DomainRecord1]

# domain name, like google.com

domain=iioog.com【填写根域名】

# subdomain name, like www, blog, bbs, *, @, ...

sub_domain=pan【填写子域名】

# resolve type, 'A', 'AAAA'..., currently it only supports 'A'

type=A
- 执行一次
python ddns.py
- 设置周期执行
crontab -e

*/5 * * * * cd /opt/aliyun-ddns-client && /usr/bin/python ddns.py