CentOS7.4部署Python3+Django+uWSGI+Nginx
安装环境
Remote: CentOS 7.4 x64 (django.example.com)
Python: Python3.6.5
Django: Django 2.0.4
nWSGI: uwsgi-2.0.15
Nginx: nginx- 1.10.2-1.el6
一. 系统环境配置
1.关闭iptables和selinux
# su - root
# service iptables stop
# setenforce 0
# vi /etc/sysconfig/selinux
修改
SELINUX=disabled
2.添加本地host DNS
# vi /etc/hosts
127.0.0.1 django.example.com
二. Python配置
1.安装python3.6.5源及依赖包
# yum install epel-release -y
# yum groupinstall "Development tools" -y
# yum install zlib-devel bzip2-devel openssl-devel ncurses-devel zx-devel sqlite-devel readline-devel tk-devel gdbm-devel db4-devel libpcap-devel libffi-devel -y
2.编译安装python3.6.5以及pip package manager
# wget https://www.python.org/ftp/python/3.6.5/Python-3.6.5.tar.xz --no-check-certificate
# tar xf Python-3.6.5.tar.xz
# cd Python-3.6.5
# ./configure --prefix=/usr/local --with-ensurepip=install --enable-shared LDFLAGS="-Wl,-rpath /usr/local/lib"
# make && make altinstall
3.安装virtualenv
# pip3.6 install --upgrade pip
# pip3.6 install virtualenv
三. Nginx配置
1. 安装nginx package
# yum install nginx -y
2.配置nginx with nWSGI
# vi /etc/nginx/conf.d/django.conf
server {
    listen  80;
    server_name  django.example.com;

    charset utf-8;

    access_log  /var/log/nginx/django_access.log;
    error_log   /var/log/nginx/django_error.log;

    location = /favicon.ico { access_log off; log_not_found off; }

    location /static/ {
        root /usr/share/nginx/html/django.example.com;
    }

    client_max_body_size 20M;

    location / {
        include         uwsgi_params;
        uwsgi_pass      unix:/etc/uwsgi/uwsgi-django.sock;
        uwsgi_read_timeout 30s;
        uwsgi_send_timeout 30s;
    }

}
四. Django+uWSGI配置
1. uWSGI配置
# mkdir -p /etc/uwsgi
# vi /etc/uwsgi/uwsgi-django.ini
[uwsgi]
project = django.example.com
base = /data/www

chdir = %(base)/%(project)
home = %(base)/%(project)/.py3env
module = myproject.wsgi:application

pidfile = /tmp/uwsgi-master-django.pid

master = true
processes = 2
enable-threads = true

# use unix socket because it is more secure and faster than TCP socket
socket = /etc/uwsgi/uwsgi-django.sock
chmod-socket = 660
uid = nginx
gid = nginx

vacuum = true
die-on-term = true

logto = /var/log/nginx/uwsgi-django.log
2. 配置Django base folder
# cd /usr/share/nginx/html
# mkdir django.example.com
# cd django.example.com
# virtualenv -p /usr/local/bin/python3 .py3env
3. 开启virtualenv python3环境
# source .py3env/bin/activate
4. 在此环境安装Django相关模块
# pip install django uwsgi PyMySQL
5. 创建uWSGI启动脚本
# mkdir -p /etc/uwsgi/bin
# vi /etc/systemd/system/uwsgi-django.service
[Unit]
    Description=uWSGI instance to serve myproject

[Service]
    BASE=/data/www/django.example.com
    ENV=$BASE/.py3env
    ExecStartPre=-/usr/bin/bash -c 'chown -R nginx:nginx /etc/uwsgi'
    ExecStart=/usr/bin/bash -c 'source /usr/share/nginx/html/django.example.com/.py3env/bin/activate; uwsgi --ini /etc/uwsgi/uwsgi-django.ini'

[Install]
    WantedBy=multi-user.target
五. Django项目配置
1. 保证virtualenv python3环境开启
# cd /usr/share/nginx/html/django.example.com/
# source .py3env/bin/activate
2.创建一个Django项目
# django-admin startproject myproject .
3.添加static目录
# vi myproject/settings.py
末行添加:
STATIC_ROOT = os.path.join(BASE_DIR, "static/")
4.创建本地SQLlite文件
Tip:这里使用SQLlite代替其他数据库作为我们项目的DB
# ./manage.py makemigrations
# ./manage.py migrate
Operations to perform:
  Apply all migrations: admin, auth, contenttypes, sessions
Running migrations:
  Applying contenttypes.0001_initial... OK
  Applying auth.0001_initial... OK
  Applying admin.0001_initial... OK
  Applying admin.0002_logentry_remove_auto_add... OK
  Applying contenttypes.0002_remove_content_type_name... OK
  Applying auth.0002_alter_permission_name_max_length... OK
  Applying auth.0003_alter_user_email_max_length... OK
  Applying auth.0004_alter_user_username_opts... OK
  Applying auth.0005_alter_user_last_login_null... OK
  Applying auth.0006_require_contenttypes_0002... OK
  Applying auth.0007_alter_validators_add_error_messages... OK
  Applying auth.0008_alter_user_username_max_length... OK
  Applying auth.0009_alter_user_last_name_max_length... OK
  Applying sessions.0001_initial... OK
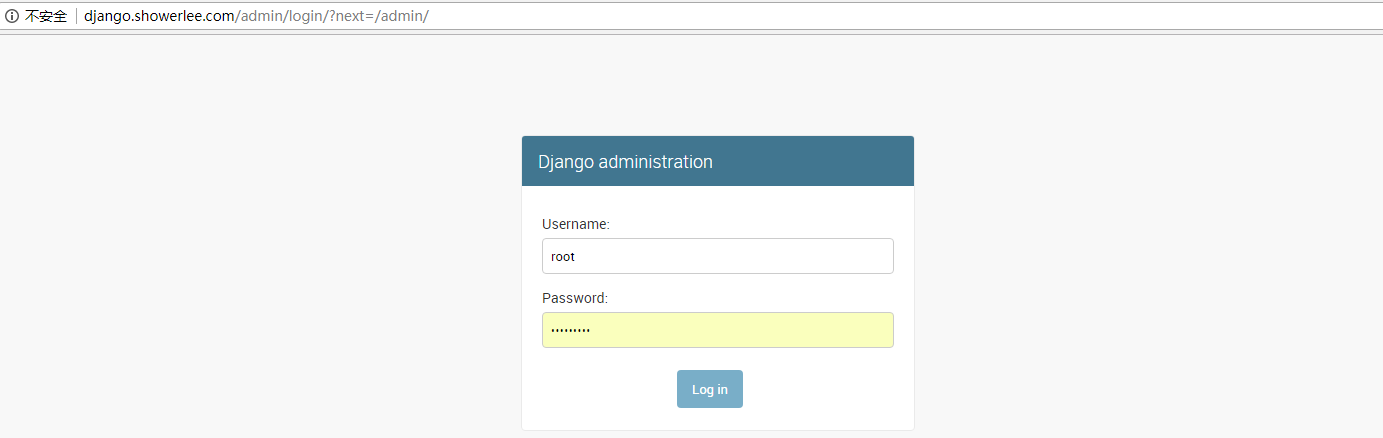
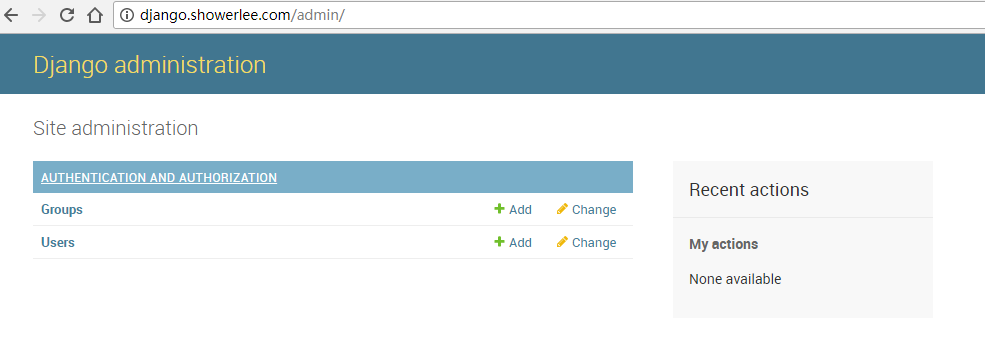
5.创建项目管理员账户
# ./manage.py createsuperuser
Username (leave blank to use 'root'): root
Email address: admin@admin.com
Password:
Password (again):
Superuser created successfully.
6.生成项目静态文件目录
# ./manage.py collectstatic
7.修改wsgi入口文件
# vi myproject/wsgi.py
import os
import sys
os.environ.setdefault("DJANGO_SETTINGS_MODULE", "myproject.settings")
sys.path.append('/usr/share/nginx/html/django.example.com')

from django.core.wsgi import get_wsgi_application

application = get_wsgi_application()
8.添加ALLOWED_HOSTS
# vi myproject/settings.py
Update:
ALLOWED_HOSTS = ['django.example.com']
9. 修改权限(可执行并保持与nginx启动user一致)
# chmod -R 755 /etc/uwsgi
# chown -R nginx:nginx /etc/uwsgi
# chmod -R 755 /usr/share/nginx/html/django.example.com
# chown -R nginx:nginx /usr/share/nginx/html/django.example.com
10.启动nginx+uwsgi
# systemctl restart nginx
# systemctl restart uwsgi-django
展示效果(保证Windows本地host文件能够解析django.example.com)
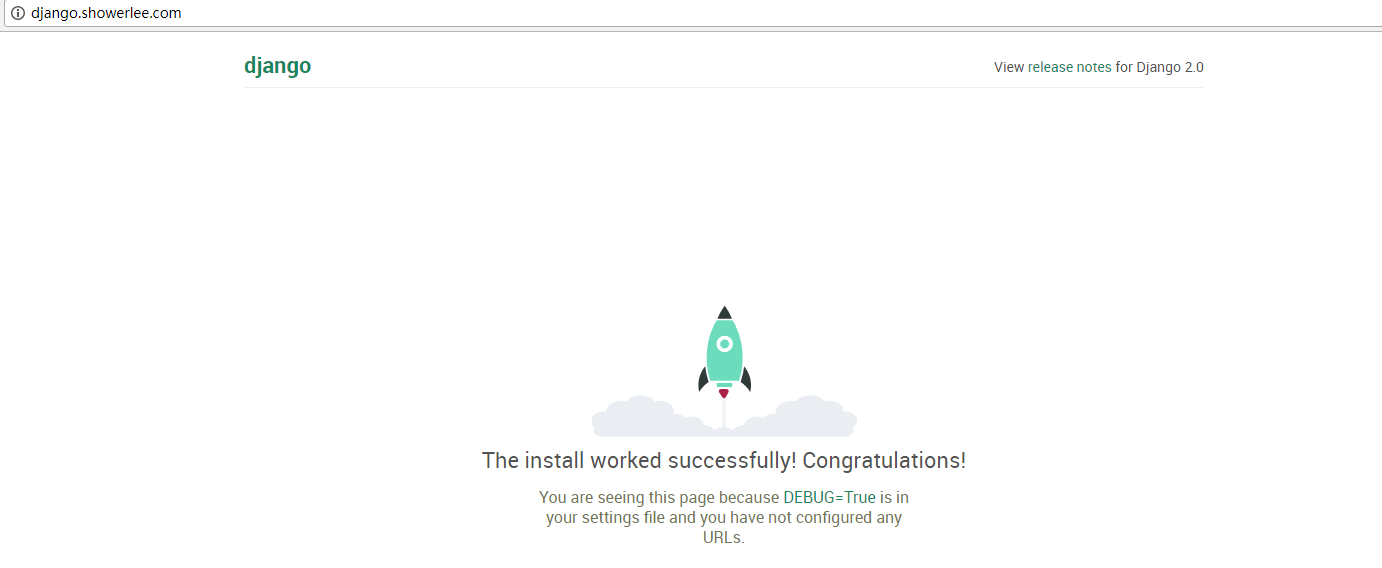
Finished...