Python 简单爬虫
什么是爬虫
爬虫指的系统性抓取网络页面的网络机器人。原理图如下:

上图涉及了爬虫的任务调度控制,多线程,存储机制等,本文不会涉及。
我们从最简单的故事谈起,当你浏览一个网站时, 发现上面的图片比较有意思,会右键保存下来,当人为操作过多时, 就会想办法自动化实现。
首先是图片的保存, 我们知道直接使用linux 命令 curl -O http://img-url 就可以下载图片;
那么如何获取图片地址呢, 很明显图片的链接地址存放在页面的源码中, command + u 就可以查看到页面的 source code, curl http://site-url 能获取到页面源码,
图片地址一般的格式为 , 很容易就能筛选出来。 </img>
上面分为三个部分, 获取页面代码, 解析页面代码, 存储&&展示。因此, 本人对爬虫的理解如下:
- 打开网页
- 解析网页
- 重复上两步,将数据保存下来
回到最开始的爬虫原理图, 在大规模网页爬取时,考虑到性能问题,会引入多线程等集群化抓取, 比如rq ; 已经爬过的页面不能从复爬,考虑到去重复问题, 会引入个 hash 或者更高级的 Bloom Filter; 数据的保存和抽取,丢到 MogoDB 中。 这样上图中的内容都包括了。
举个例子
不忘初衷,以爬妹子图 为例,简单说明一下简单爬虫的需要用到的知识。
import os
from urllib.request import urlopen, urlretrieve
import re
import time
import sys


def get_girls(url):
    page_source = urlopen(url).read().decode('GBK')
    pattern = r'<img alt="\S+" src="(\S+)" /><br />'
    img_urls = re.findall(pattern, page_source)
    for img_url in img_urls:
        img_name = sys.path[0] + os.sep + str(time.time()) + '.jpg'
        urlretrieve(img_url, filename=img_name)

get_girls('http://www.meizitu.com/a/5284.html')
函数 get_girls 里面, 使用到了 urllib 与 re 正则库, 稍后介绍, 执行过程如代码所述:
urlopen()将页面源码拉下来re.findall(pattern, source)匹配到图片地址urlretrieve()下载到本地
随便输入几个地址执行下:

很简单有趣吧~ 如果只是获取到图片地址,可直接在交互命令行搞
>>> url = 'http://www.meizitu.com/a/5284.html'
>>> page_source = str(urlopen(url).read())
>>> img_urls = re.findall(r'<img alt="\S+" src="(\S+)" /><br />', page_source)
>>> img_urls
['http://pic.meizitu.com/wp-content/uploads/2016a/01/21/01.jpg', 'http://pic.meizitu.com/wp-content/uploads/2016a/01/21/02.jpg', 'http://pic.meizitu.com/wp-content/uploads/2016a/01/21/03.jpg', 'http://pic.meizitu.com/wp-content/uploads/2016a/01/21/04.jpg', 'http://pic.meizitu.com/wp-content/uploads/2016a/01/21/05.jpg', 'http://pic.meizitu.com/wp-content/uploads/2016a/01/21/06.jpg', 'http://pic.meizitu.com/wp-content/uploads/2016a/01/21/07.jpg']
页面源码拉取, 解析html, 获取数据,以上就是简单 Python 爬虫介绍。针对解析这一部分,有很多开源的库可以玩,非常有意思~
Python 爬虫基本库
Python urllib
urllib 库是 python Http 协议的一个封装, 爬虫用到的网络请求操作, 在 urllib.requet 中。详情用法看文档, 常见的简单用法如下:
读取网页 URL 可以是本地文件, ftp 地址等
from urllib.request import urlopen, urlretrieve, Request, HTTPBasicAuthHandler, build_opener, install_opener
res = urlopen('https://www.alipay.com/')
    print(res.read(100))

# 指定编码
with urlopen('https://www.alipay.com/') as res:
    print(res.read(300).decode('utf-8'))
请求 CGI 端口
req = Request(url='http://staff.washington.edu/corey/info.cgi', data=None)
with urlopen(req) as f:
    print(f.read())
官方文档给出的基本 Http 验证
# Create an OpenerDirector with support for Basic HTTP Authentication...
auth_handler = HTTPBasicAuthHandler()
auth_handler.add_password(realm='PDQ Application',
                          uri='https://mahler:8092/site-updates.py',
                          user='klem',
                          passwd='kadidd!ehopper')
opener = build_opener(auth_handler)
# ...and install it globally so it can be used with urlopen.
install_opener(opener)
urlopen('http://www.example.com/login.html')
使用 代理方式验证请求
proxy_handler = urllib.request.ProxyHandler({'http': 'http://www.example.com:3128/'})
proxy_auth_handler = urllib.request.ProxyBasicAuthHandler()
proxy_auth_handler.add_password('realm', 'host', 'username', 'password')

opener = urllib.request.build_opener(proxy_handler, proxy_auth_handler)
# This time, rather than install the OpenerDirector, we use it directly:
opener.open('http://www.example.com/login.html')
保存到本地
urlretrieve('https://alipay.com', '/tmp/index.html')Python 正则
爬虫的第二个阶段, 用正则解析源代码。 正则语法很有意思, 写多了就不利于理解, 因此爬虫的解析库发展的多种多样, 基本原理还是基于 re 库。 具体的使用, 还是用 DOM 解析库比较方便, 当没辙时, 不得不回到正则大法~
re.search re.match re.findall 的基本使用如下, 详细的使用可以看看Python正则表达式指南
re.findall
import re

relink = '<a href="(.*)">(.*)</a>'
info = '<a href="http://www.google.com">google</a>'
cinfo = re.findall(relink, info)
print(cinfo)
# output: [('http://www.google.com', 'google')]
re.match
尝试从字符串的起始位置匹配一个模式,如果不是起始位置匹配成功的话,match() 就返回none。。
line = "Google are much better than baidu."

matchObj = re.match(r'(.*) are (.*?) .*', line, re.M | re.I)

if matchObj:
    print("matchObj.group() : ", matchObj.group())
    print("matchObj.group(1) : ", matchObj.group(1))
    print("matchObj.group(2) : ", matchObj.group(2))
else:
    print("No match!!")

# [('http://www.google.com', 'google')]
# matchObj.group() :  Google are much better than baidu.
# matchObj.group(1) :  Google
# matchObj.group(2) :  much
re.search
re.match只匹配字符串的开始,如果字符串开始不符合正则表达式,则匹配失败,函数返回None;而re.search匹配整个字符串,直到找到一个匹配。
matchObj = re.match(r'Gogle', line, re.M | re.I)
if matchObj:
    print("match --> matchObj.group() : ", matchObj.group())
else:
    print("No match!!")

matchObj = re.search(r'Google', line, re.M | re.I)
if matchObj:
    print("search --> matchObj.group() : ", matchObj.group())
else:
    print("No match!!")

# No match!!
# search --> matchObj.group() :  Google
Python 正则字典
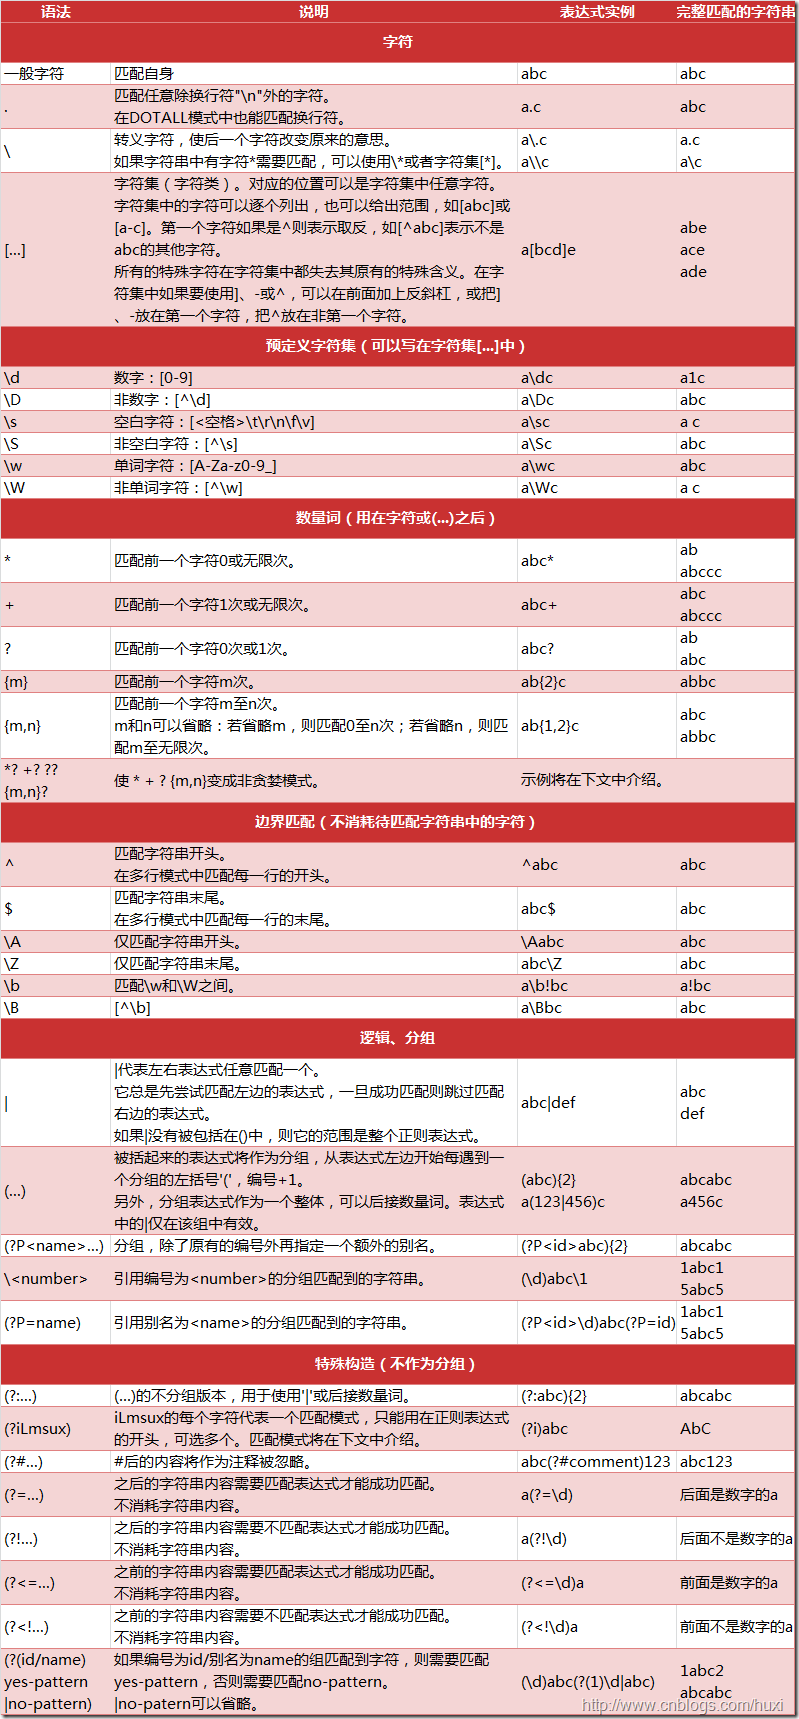
最后, 贴一张 Python 支持的表达式元字符: