Slate 是一个使用 TypeScript 开发富文本编辑器开发框架,诞生于 2016 年。
介绍 Slate 是一个使用 TypeScript 开发富文本编辑器开发框架,诞生于 2016 年,作者是 Ian Storm Taylor 。它吸收了 Quill ,Prosemirror ,Draft.js 的优点,核心数据模型十分精简,具有高度的可扩展性,最新版本为 v0.60.1 。
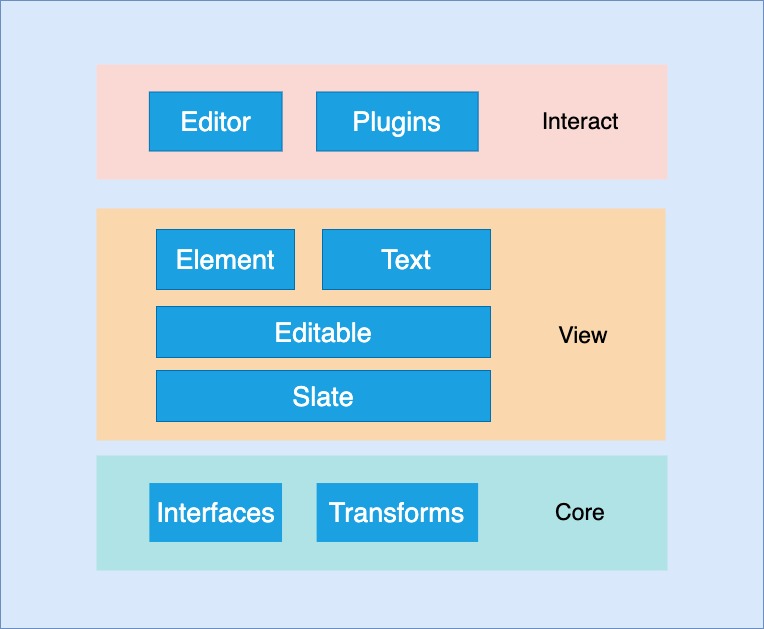
特点 插件作为一等公民,能够完全修改编辑器行为 数据层和渲染层分离,更新数据触发渲染 文档数据类似于 DOM 树,可嵌套 具有原子化操作 API,理论上支持协同编辑 使用 React 作为渲染层 不可变数据结构 Immer 架构图
源码分析 Slate 使用 monorepo 方式管理仓库,packages 目录中有 4 个源码包。
slate slate 核心仓库,包含抽象数据模型 interfaces,操作节点的方法 transforms,创建实例的方法等。
Interfaces intefaces 目录下是 Slate 定义的数据模型。
Node 表示 Slate 文档树中不同类型的节点。
1
2
3
4
5
export type BaseNode = Editor | Element | Textexport type Descendant = Element | Textexport type Ancestor = Editor | Element
Editor 对象用于存储编辑器的所有状态,可以通过插件添加辅助函数或实现新行为。
1
2
3
4
5
6
7
8
export interface BaseEditor { children: Descendant[] selection: Selection operations: Operation[] marks: Omit<Text, 'text' > | null }
Element 对象是 Slate 文档树中包含其他 Element 或 Text 的一种节点,取决于编辑器配置它可以是块级 block 或内联 inline 的。
1
2
3
4
5
6
7
export interface ElementInterface { isAncestor: (value: any ) => value is Ancestor isElement: (value: any ) => value is Element isElementList: (value: any ) => value is Element[] isElementProps: (props: any ) => props is Partial<Element> matches: (element: Element, props: Partial<Element> ) => boolean }
Text 对象表示文档树中的叶子节点,是实际包含文本和格式的节点,它们不能包含其他节点。
1
2
3
4
5
6
7
8
export interface TextInterface { equals: (text: Text, another: Text, options?: { loose?: boolean } ) => boolean isText: (value: any ) => value is Text isTextList: (value: any ) => value is Text[] isTextProps: (props: any ) => props is Partial<Text> matches: (text: Text, props: Partial<Text> ) => boolean decorations: (node: Text, decorations: Range[] ) => Text[] }
Path 是一个描述节点在文档树中的具体位置的索引列表,一般相对于 Editor 节点,但也可以是其他 Node 节点。
1
2
3
4
5
6
7
8
9
10
11
12
13
14
15
16
17
18
19
20
21
22
23
24
25
26
27
28
29
30
31
32
33
34
export interface PathInterface { ancestors: (path: Path, options?: { reverse?: boolean } ) => Path[] common: (path: Path, another: Path ) => Path compare: (path: Path, another: Path ) => -1 | 0 | 1 endsAfter: (path: Path, another: Path ) => boolean endsAt: (path: Path, another: Path ) => boolean endsBefore: (path: Path, another: Path ) => boolean equals: (path: Path, another: Path ) => boolean hasPrevious: (path: Path ) => boolean isAfter: (path: Path, another: Path ) => boolean isAncestor: (path: Path, another: Path ) => boolean isBefore: (path: Path, another: Path ) => boolean isChild: (path: Path, another: Path ) => boolean isCommon: (path: Path, another: Path ) => boolean isDescendant: (path: Path, another: Path ) => boolean isParent: (path: Path, another: Path ) => boolean isPath: (value: any ) => value is Path isSibling: (path: Path, another: Path ) => boolean levels: ( path: Path, options?: { reverse?: boolean } ) => Path[] next: (path: Path ) => Path parent: (path: Path ) => Path previous: (path: Path ) => Path relative: (path: Path, ancestor: Path ) => Path transform: ( path: Path, operation: Operation, options?: { affinity?: 'forward' | 'backward' | null } ) => Path | null }
Point 对象表示文本节点在文档树中的一个特定位置。
1
2
3
4
5
6
7
8
9
10
11
12
export interface PointInterface { compare: (point: Point, another: Point ) => -1 | 0 | 1 isAfter: (point: Point, another: Point ) => boolean isBefore: (point: Point, another: Point ) => boolean equals: (point: Point, another: Point ) => boolean isPoint: (value: any ) => value is Point transform: ( point: Point, op: Operation, options?: { affinity?: 'forward' | 'backward' | null } ) => Point | null }
Operation 对象是 Slate 用来更改内部状态的低级指令,Slate 将所有变化表示为 Operation 。
1
2
3
4
5
6
7
8
export interface OperationInterface { isNodeOperation: (value: any ) => value is NodeOperation isOperation: (value: any ) => value is Operation isOperationList: (value: any ) => value is Operation[] isSelectionOperation: (value: any ) => value is SelectionOperation isTextOperation: (value: any ) => value is TextOperation inverse: (op: Operation ) => Operation }
Transforms 是对文档进行操作的辅助函数,包括选区转换,节点转换,文本转换和通用转换。
1
2
3
4
5
6
export const Transforms = { ...GeneralTransforms, ...NodeTransforms, ...SelectionTransforms, ...TextTransforms, }
createEditor 创建编辑器实例的方法,返回一个实现了 Editor 接口的编辑器实例对象。
1 2 3 4 5 6 7 export const createEditor = (): Editor => const editor: Editor = {} return editor }
slate-react slate-react 编辑器的 React 组件,渲染文档数据。
Slate 组件上下文的包装器,处理 onChange 事件,接受文档数据 value。
1 2 3 4 5 6 7 8 9 10 11 12 13 14 export const Slate = () => return ( <SlateContext.Provider value={context}> <EditorContext.Provider value={editor}> <FocusedContext.Provider value={ReactEditor.isFocused(editor)}> {children} </FocusedContext.Provider> </ EditorContext.Provider> </SlateContext.Provider> ) }
Editable 编辑器的主要区域,设置标签属性,处理 DOM 事件。
1 2 3 4 5 6 7 8 9 10 11 12 export const Editable = (props: EditableProps ) => { return ( <ReadOnlyContext.Provider value={readOnly}> <Component> <Children /> </Component> </ ReadOnlyContext.Provider> ) }
Children 根据编辑器文档数据生成渲染组件。
1 2 3 4 5 6 7 const Children = () => const children = [] return <React.Fragment>{children}</React.Fragment> }
Element 渲染 Elment 的组件,使用 renderElement 方法渲染元素,使用 Children 组件生成子元素。
1 2 3 4 5 6 7 8 9 10 const Element = () => return ( <SelectedContext.Provider value={!!selection}> {renderElement({ attributes, children, element })} </SelectedContext.Provider> ) }
Text 渲染文本节点组件。
1 2 3 4 5 6 7 8 9 10 const Text = () => return ( <span data-slate-node="text" ref={ref}> {children} </span> ) }
withReact Slate 插件,添加/重写了编辑器实例的一些方法。
1 2 3 4 5 6 7 8 9 10 11 12 13 14 15 16 17 18 19 20 21 export const withReact = <T extends Editor>(editor: T ) => { const e = editor as T & ReactEditor const { apply, onChange } = e e.apply = () => } e.setFragmentData = () => } e.insertData = () => } e.onChange = () => } return e }
slate-history slate-history Slate 插件,为编辑器提供 撤销 **和 重做**功能。
History 使用 redos 和 undos 数组存储编辑器所有底层 Operation 命令的对象。
1 2 3 4 5 export interface History { redos: Operation[][] undos: Operation[][] }
HistoryEditor 带有历史记录功能的编辑器对象,具有操作历史记录的方法。
1 2 3 4 export const HistoryEditor = { }
withHistory Slate 编辑器插件,使用 undos 和 redos 栈追踪编辑器操作,实现编辑器的 redo,undo 方法,重写了apply 方法。
1 2 3 4 5 6 7 8 9 10 11 12 13 14 15 16 17 18 19 20 21 export const withHistory = <T extends Editor>(editor: T ) => { const e = editor as T & HistoryEditor const { apply } = e e.history = { undos: [], redos: [] } e.redo = () => } e.undo = () => } e.apply = (op: Operation ) => { } return e }
slate-hyperscript slate-hyperscript 是一个使用 JSX 编写 Slate 文档的 hyperscript 工具
插件机制 Slate 的插件只是一个返回 editor 实例的函数,在这个函数中通过重写编辑器实例方法,修改编辑器行为。
1
2
3
4
5
6
7
8
9
import { Editor } from 'slate' const myPlugin = (editor: Editor ) => { editor.apply = () => return editor } export default myPlugin
1
2
3
4
import { createEditor } from 'slate' import myPlugin from './myPlugin' const editor = myPlugin(createEditor())
如此以来插件就能完全控制编辑器行为,正如 Slate 的官方介绍所说
Slate 是一个 完全 可定制的富文本编辑器框架。
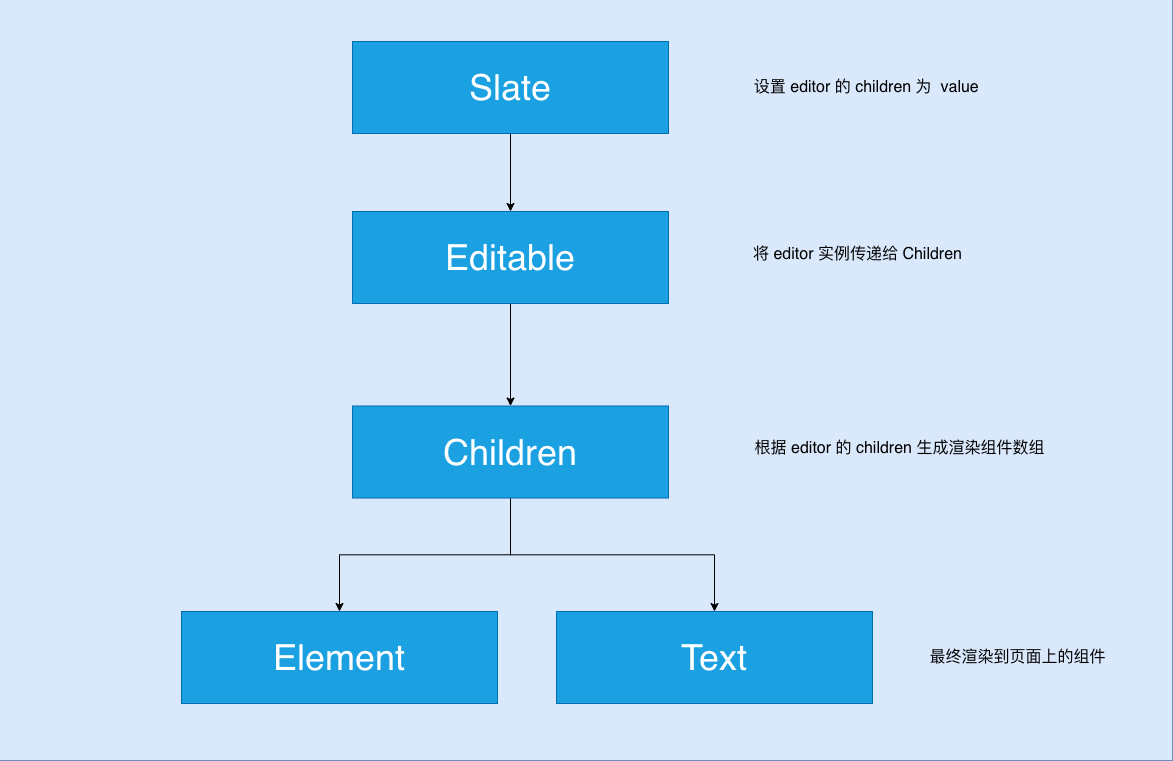
渲染机制 渲染原理 Slate 的文档数据是一颗类似 DOM 的节点树,slate-react 通过递归这颗树生成 children 数组,这个数组有两种类型的组件 Element 和 Text, 最终 raect 将 children 数组中的组件渲染到页面上,步骤如下。
设置编辑器实例的 children 属性 1 2 3 4 5 6 7 8 9 10 11 12 13 14 15 export const Slate = (props: { }) => { const { editor, children, onChange, value, ...rest } = props const context: [ReactEditor] = useMemo(() => editor.children = value }, []) }
Editable 组件传递 editor 实例给 Children1 2 3 4 5 6 7 8 9 10 11 12 13 14 15 16 17 export const Editable = (props: EditableProps ) => { const editor = useSlate() return ( <ReadOnlyContext.Provider value={readOnly}> <Component> <Children node={editor} /> </Component> </ ReadOnlyContext.Provider> ) }
Children 生成渲染数组,交给 React 渲染组件。1 2 3 4 5 6 7 8 9 10 11 12 13 14 15 16 17 18 19 const Children = (props: { }) => { const children = [] for (let i = 0 ; i < node.children.length; i++) { if (Element.isElement(n)) { children.push(<ElementComponent />) } else { children.push(<TextComponent />) } } return <React.Fragment>{children}</React.Fragment> }
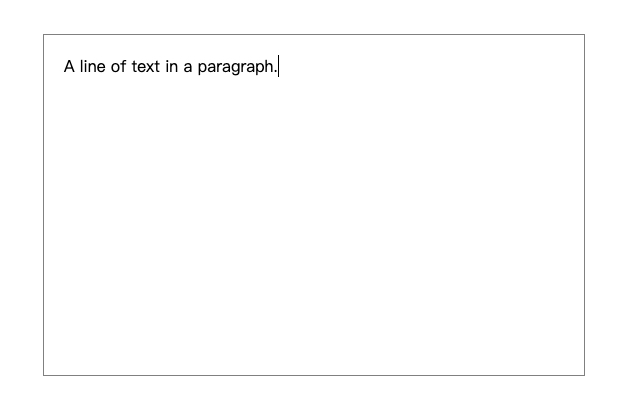
假设有以下数据
1 2 3 4 5 6 7 8 9 10 11 12 13 14 15 16 17 18 ;[ { type: 'paragraph' , children: [ { text: 'A line of text in a paragraph.' , }, ], }, { type: 'paragraph' , children: [ { text: 'Another line of text in a paragraph.' , }, ], }, ]
页面显示为
自定义渲染 传递渲染函数 renderElement 和 renderLeaf 给 Editable 组件,对元素和叶子节点进行自定义渲染。
1 2 3 4 5 6 7 8 9 10 11 12 13 14 15 16 17 18 19 20 21 22 23 24 25 26 27 28 29 30 31 const Leaf = (props ) => { let { attributes, children, leaf } = props if (leaf.bold) { children = <strong>{children}</strong> } return <span {...attributes}>{children}</ span>} const Element = (props ) => { const { element } = props switch (element.type) { case 'custom-type' : return <CustomElement {...props} /> default : return <DefaultElement {...props} /> } } const renderLeaf = props =>const renderElement = props =><Slate> <Editable renderLeaf={renderLeaf} renderElement={renderElement} /> </Slate>
触发渲染 slate-react 的 withReact 插件会重写编辑器的 onChange 方法,在每次文档数据更新时,调用 onContextChange 函数,执行 setKey(key + 1) 触发 React 重新渲染。
1 2 3 4 5 6 7 8 9 10 11 12 13 14 export const Slate = () => const [key, setKey] = useState(0 ) const onContextChange = useCallback(() => onChange(editor.children) setKey(key + 1 ) }, [key, onChange]) EDITOR_TO_ON_CHANGE.set(editor, onContextChange) }
1 2 3 4 5 6 7 8 9 10 11 12 13 14 15 16 17 18 19 export const withReact = <T extends Editor>(editor: T ) => { e.onChange = () => ReactDOM.unstable_batchedUpdates(() => const onContextChange = EDITOR_TO_ON_CHANGE.get(e) if (onContextChange) { onContextChange() } onChange() }) } return e }
实践示例 一个基础的富文本编辑器 导入依赖,创建 <MyEditor /> 组件 1 2 3 4 5 6 7 8 9 import { createEditor } from 'slate' import React, { useMemo, useState } from 'react' import { Slate, Editable, withReact } from 'slate-react' const MyEditor = () => return null } export default MyEditor
创建编辑器对象 editor 和文档数据 value,传递给 <Slate /> 。 1 2 3 4 5 6 7 8 9 10 11 12 13 14 15 const MyEditor = () => const [value, setValue] = useState([]) const editor = useMemo(() => return ( <Slate editor={editor} value={value} onChange={(value) => setValue(value)} ></Slate> ) }
使用 <Editable /> 渲染编辑器主要区域。 1 2 3 4 5 6 7 8 9 10 11 12 13 14 15 16 17 18 19 20 21 const MyEditor = () => const [value, setValue] = useState([]) const editor = useMemo(() => return ( <Slate editor={editor} value={value} onChange={(value) => setValue(value)}> <Editable style={{ width: 500 , height: 300 , padding: 20 , border: '1px solid grey' , }} placeholder="This is placeholder..." /> </Slate> ) }
添加编辑器的默认值,此时页面上会出现这行文本。 1 2 3 4 5 6 7 8 9 10 11 12 13 14 15 16 17 18 19 20 21 22 23 24 25 26 27 28 29 30 31 32 33 const initialValue = [ { type: 'paragraph' , children: [ { text: 'A line of text in a paragraph.' , }, ], }, ] const MyEditor = () => const [value, setValue] = useState(initialValue) const editor = useMemo(() => return ( <Slate editor={editor} value={value} onChange={(value) => setValue(value)}> <Editable style={{ width: 500 , height: 300 , padding: 20 , border: '1px solid grey' , }} placeholder="This is placeholder..." /> </Slate> ) }
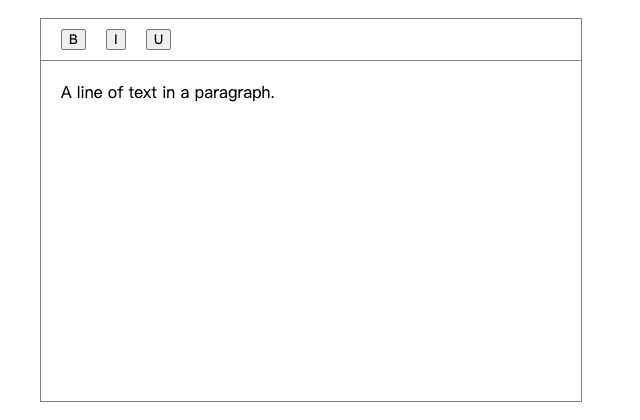
创建工具栏组件,添加加粗,斜体,下划线按钮。 1 2 3 4 5 6 7 8 9 10 11 12 13 14 15 16 17 18 19 20 21 22 23 24 25 26 27 28 29 30 31 32 33 34 35 36 37 38 39 40 41 42 43 44 45 46 47 48 49 50 51 52 53 54 55 56 57 58 59 60 61 62 63 64 65 const MyToolbar = () => return ( <div style={{ width: 500 , display: 'flex' , padding: '10px 20px' , alignItems: 'center' , margin: '0 auto' , marginTop: 50 , border: '1px solid grey' , }} > <button style={{ marginRight: 20 , }} onMouseDown={(event) => { event.preventDefault() }} > B </button> <button style={{ marginRight: 20, }} onMouseDown={(event) => { event.preventDefault() }} > I </ button> <button style={{ marginRight: 20 , }} onMouseDown={(event) => { event.preventDefault() }} > U </button> </ div> ) } <Slate editor={editor} value={value} onChange={(value) => setValue(value)}> <MyToolbar /> <Editable style={{ width: 500 , height: 300 , padding: 20 , margin: '0 auto' , border: '1px solid grey' , borderTopWidth: 0 , }} placeholder="This is placeholder..." /> </Slate>
设置加粗,斜体,下划线渲染样式,传递 renderLeaf 函数给 Editable。 1 2 3 4 5 6 7 8 9 10 11 12 13 14 15 16 17 18 19 20 21 22 23 24 25 26 27 28 29 30 31 32 33 34 35 36 37 38 39 40 const Leaf = (props ) => { let { attributes, children, leaf } = props if (leaf.bold) { children = <strong > {children}</strong > } if (leaf.italic) { children = <i > {children}</i > } if (leaf.underline) { children = <u > {children}</u > } return <span {...attributes }> {children}</span > } const MyEditor = () => const renderLeaf = useCallback((props ) => { return <Leaf {...props } /> }, []) return ( <Slate editor={editor} value={value} onChange={(value) => setValue(value)}> <MyToolbar editor={editor} /> <Editable renderLeaf={renderLeaf} /> </Slate> ) }
在工具栏上添加转换节点属性的方法,点击时调用。 1 2 3 4 5 6 7 8 9 10 11 12 13 14 15 16 17 18 19 20 21 22 23 24 25 26 27 28 29 30 31 32 33 34 35 36 37 38 39 40 41 42 43 44 45 46 47 48 49 50 51 52 53 54 55 56 import React from 'react' import { Text, Editor } from 'slate' import { Transforms } from 'slate' const isFormatActive = (editor, format ) => { const [match] = Editor.nodes(editor, { match: (n ) => n[format] === true , universal: true , }) return !!match } const toggleFormat = (event, editor, format ) => { event.preventDefault() const isActive = isFormatActive(editor, format) Transforms.setNodes( editor, { [format]: isActive ? false : true }, { match : (n ) => Text.isText(n), split : true } ) } const MyToolbar = ({ editor } ) => { return ( <div style={{ width: 500 , display: 'flex' , padding: '10px 20px' , alignItems: 'center' , margin: '0 auto' , marginTop: 50 , border: '1px solid grey' , }} > <button style={{ marginRight: 20 , }} onClick={(event) => { toggleFormat(event, editor, 'bold' ) }} > B </button> / </div> ) }
创建一个自定义树型元素 Slate 的强大之处在于它的可扩展性,以下展示如何自定义一个树形元素。
定义树形元素 1 2 3 4 5 6 7 8 9 10 11 12 13 14 15 16 17 18 19 20 21 22 23 24 25 26 27 28 29 30 31 32 33 34 35 import React, { useState } from 'react' const TreeElement = ({ attributes, children, element } ) => { const { checked, label } = element const [isChecked, setIsChecked] = useState(checked) const onChange = () => setIsChecked(!isChecked) } return ( <div {...attributes}> <p style={{ display: 'flex' , alignItems: 'center' , }} contentEditable={false } > <input type="checkbox" style={{ width: 20 , }} checked={isChecked} onChange={onChange} /> <label>{label}</label> </ p> {isChecked ? <div style ={{ paddingLeft: 20 }}> {children}</div > null } </div> ) }
将 renderElement 方法传递给 <Editable />。 1 2 3 4 5 6 7 8 9 10 11 12 13 14 15 16 17 18 19 const Element = (props ) => { const { element } = props switch (element.type) { case 'tree-item' : return <TreeElement {...props } /> default : return <DefaultElement {...props } /> } } const renderElement = useCallback((props ) => <Element {...props } /> <Editable renderElement={renderElement} />
添加树形元素数据 1 2 3 4 5 6 7 8 9 10 11 12 13 14 15 16 17 18 19 20 21 22 23 24 25 26 27 28 29 30 31 32 const initialValue = [ { type: 'tree-item' , checked: true , label: 'first level' , children: [ { type: 'tree-item' , checked: false , label: 'second level' , children: [ { type: 'tree-item' , label: 'third level' , checked: false , children: [ { type: 'paragraph' , children: [ { text: 'This is a tree item' , }, ], }, ], }, ], }, ], }, ]
创建一个控制输入的插件 以下展示如何定义一个 Slate 插件
创建一个 withEmojis 插件 1 2 3 4 5 6 7 8 9 10 11 12 13 14 15 16 17 18 19 20 21 22 23 24 25 26 27 28 29 30 31 32 33 34 35 36 37 38 39 40 41 42 43 44 45 46 47 48 import { ReactEditor } from 'slate-react' const letterEmojis = { a: '🐜' , b: '🐻' , c: '🐱' , d: '🐶' , e: '🐘' , f: '🦊' , g: '🐦' , h: '🐵' , i: '🦄' , j: '🦋' , k: '🦀' , l: '🦁' , m: '🐭' , n: '🐮' , o: '🐋' , p: '🐼' , q: '🐧' , r: '🐰' , s: '🕷' , t: '🐯' , u: '🐍' , v: '🦖' , w: '🦕' , x: '🦛' , y: '🐳' , z: '🦓' , } const withEmojis = (editor: ReactEditor ) => { const { insertText } = editor editor.insertText = (text: string ) => { if (letterEmojis[text.toLowerCase()]) { text = letterEmojis[text] } insertText(text) } return editor } export default withEmojis
在新建编辑器对象时使用插件 1 2 3 const editor = useMemo(() =>
不足之处 还没有发布正式版,处于 Beta 阶段,API 可能会有变化 渲染层目前只有 React,要在其他框架中使用需要自行实现 数据渲染分离,需要完全控制用户输入行为,否则可能导致数据和渲染不同步 基于 contenteditable 无法突破浏览器的排版效果 对中文输入支持不足,详见此 链接 社区驱动开发,问题可能得不到及时修复 总结 Slate 是一个设计优秀的富文本编辑器开发框架,具有很高的可扩展性。
参考 开源富文本编辑器技术的演进(2020 1024) slate 架构设计分析 编辑器初体验 Slate 中文文档