使用 exiftool 方便快捷写入图片的 exif metadata
我现在都在用 squoosh 批量压缩照片。但是 squoosh 压缩出来的图片丢失了 exif 数据,不论是网页还是终端 squoosh-cli。关于使用终端 squoosh-cli 批量压缩图片,你可以阅读我写的 [可能是]最好的压缩图片程序,使用 squoosh-cli 批量压缩图片
关于在得到压缩后的图片不丢失exif元数据这个问题,我尝试了其他压缩工具,比如 tinypng.com 也一样无法实现目的。
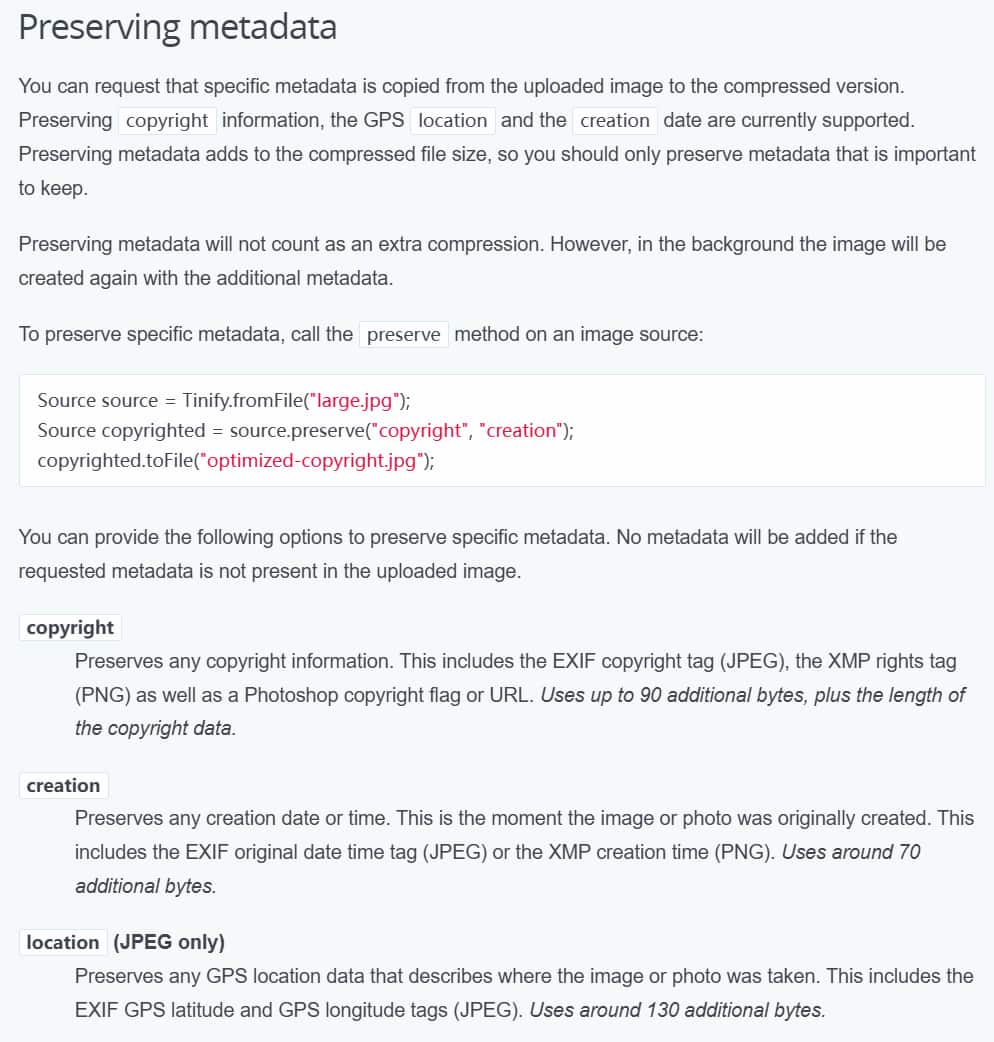
tinypng.com 的 web,压缩后的图片无法得到元数据。然后我关注到了其 API, https://tinypng.com/developers/reference/java

我写了段Java代码试了一下,通过调用方法 source.preserve("copyright", "creation", "location"); 可以保存元数据
System.out.println("start to tiny your images...");
        try {
            String path = "c:\\users\\dk\\downloads\\IMG_1989.jpg";
            Source source = Tinify.fromFile(path);
            String lowercasedPath = path.toLowerCase(Locale.ROOT);
            Source sourceWithMetadata;
            if (lowercasedPath.endsWith(".jpg") || lowercasedPath.endsWith(".jpeg")) {
                //location
                sourceWithMetadata = source.preserve("copyright", "creation", "location");
            }
            else {
                sourceWithMetadata = source.preserve("copyright", "creation");
            }
            sourceWithMetadata.toFile("c:\\users\\dk\\downloads\\IMG_1989-dk-compressed.jpg");
        }
        catch (IOException e) {
            throw new RuntimeException(e);
        }
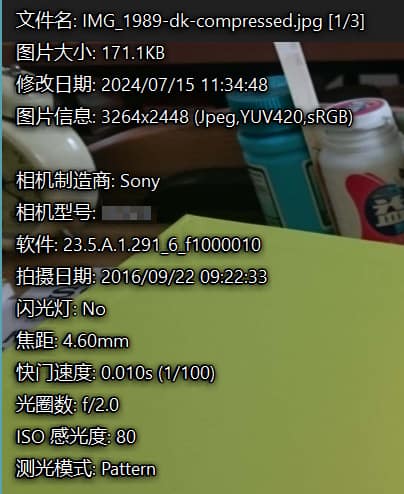
但是经过实践发现只保留下来了图片拍摄时间。我想要的相机信息,镜头信息,拍摄参数(比如快门时间、ISO大小、光圈大小)等还是丢失了。
经过一番研究,我最终转变了思路。 使用 exiftool 工具写入照片的原始exif metadata,我之前居然不知道 exiftool 这么好用的工具。
ExifTool 由 Phil Harvey 开发,是一款免费、跨平台的开源软件,用于读写和处理图像(主要)、音视频和PDF等文件的元数据(metadata)。ExifTool可以作为Perl库(Image::ExifTool)使用,也有功能齐全的命令行版本。ExifTool支持很多类型的元数据,包括Exif、IPTC、XMP、JFIF、GeoTIFF、ICC配置文件、Photoshop IRB、FlashPix、AFCP和ID3,以及众多品牌的数码相机的私有格式的元数据。
本段介绍source
我在 squoosh 容器当中继续操作。
squoosh 容器基于 alpine 镜像制作,所以使用 apk 安装 exiftool 即可。我顺便安装了 tree 和 vim
# apk add exiftool vim tree然后编写一段 shell 脚本。
#!/bin/sh

# 检查是否提供了必要的参数
if [ -z "$1" ] || [ -z "$2" ]; then
    echo "Usage: $0 <input_dir> <output_dir>"
    exit 1
fi

# 从命令行参数中读取输入目录和输出目录
input_dir="$1"
output_dir="$2"

# 检查输入目录是否存在
if [ ! -d "$input_dir" ]; then
    echo "Input directory '$input_dir' does not exist."
    exit 1
fi

# 检查输出目录是否存在
if [ ! -d "$output_dir" ]; then
    echo "Output directory '$output_dir' does not exist, creating it."
    exit 1
fi

# 如果 output_dir 以 / 结尾,删除末尾的 /
if [ "${output_dir: -1}" = "/" ]; then
    output_dir="${output_dir%/}"
fi

# 遍历所有 JPG 文件
for input_file in "$input_dir"/*.jpg; do
    # 提取文件名,不带路径
    filename=$(basename "$input_file")

    # 构建目标文件路径
    output_file="${output_dir}/${filename%.jpg}-dk-compressed.jpg"

    # 检查压缩后的文件是否存在,以防万一
    if [ ! -f "$output_file" ]; then
        echo "File $output_file does not exist, skipping..."
        continue
    fi

    # 复制 EXIF 元数据
    exiftool -TagsFromFile "$input_file" -all:all "$output_file"
    echo "$output_file exif metadata write success."

    # 删除生成的备份文件(-TagsFromFile 操作会创建一个备份文件)
    rm "${output_file}_original"
done
将此 shell 文件保存为 /home/dk/copy_exif.sh
使用时的命令:~/copy_exif . ./output/
解释说明:
- 该脚本从命令行参数中读取输入目录和输出目录,可以是相对路径。会将输入路径下的所有 xxx.jpg 的元数据读取出来,写入当前文件夹下的 output 目录中的 xxx-dk-compressed.jpg 文件中,这样刚好能确保 exif metadata 有正确的归属关系
- 记住添加可执行权限
chmod +x /home/dk/copy_exif.sh - 我使用 dk 这个用户执行,因为 squoosh-cli 也是在 dk 这个用户下执行的。不在 root 下操作是不希望破坏文件权限和所有者,宿主机内的文件系统还通过 samba 挂载了,其他设备访问时如果是 root 用户操作的会无法删除文件(没有写权限)
经过 exiftool 写入exif元数据之后,文件会变大一丢丢。通过下面一个case 粗略估计文件体积会增大5%。

可以看到压缩后的照片也具有了元数据了,这对我将文件存放在 immich 里时可以有更好的读写性能,并且在浏览照片时也能看到照片 exif 信息,这对我很重要。

当然具备完整细节的原图还在SD卡/电脑里备份着。