以下内容由
[五四陈科学院] 提供
前言
本文记录一次vim改造成eclipse的过程,用起来很爽。
mac 10.10.4
安装homebrew
1
ruby -e "$(curl -fsSL https://raw.githubusercontent.com/Homebrew/install/master/install)"
在终端里运行这行命令即可安装homebrew安装工具。
输入一次密码。期间会用到git。
整一个好用的环境
1
2
3
4
brew rm -f python
brew rm -f macvim
brew install python
brew linkapps python
安装macvim
1
brew install macvim --with-python --override-system-vim
终端里输入上面的命令,千万不要在升级xcode的时候尝试。同时一定要打开一次xcode以完成同意安装。
运行这个,把macvim弄到应用里。
安装vundle
1
git clone https://github.com/gmarik/Vundle.vim.git ~/.vim/bundle/Vundle.vim
安装cmake
配置插件
复制 https://github.com/VundleVim/Vundle.vim 第三节的vimrc配置,到 ~/.vimrc 文件中。
一定要修改一个plugin的目录,作者是以自己的home目录为例。
打开macvim,运行:PluginInstall,等待vim左侧自动的安装。
编译YCM
1
2
3
4
5
6
7
cd ~/.vim/bundle/
git clone https://github.com/Valloric/YouCompleteMe.git

cd YouCompleteMe
git submodule update --init --recursive

./install.sh --clang-completer
在macvim中进行安装
vim ~/.vimrc
添加一行:
然后打开mvim,输入:PluginInstall。
解决打开后python问题
1
Fatal Python error: PyThreadState_Get: no current thread的问题
1
2
cd /opt/local/Library/Frameworks;
mv sudo mv Python.framework x
是因为macvim与YCM所使用python版本对不上号。
经常会遇到这个问题,是因为mac里可能会有多个python版本,比如brew来一个,系统默认一个,xcode再来一个,最暴力的办法,只认一个,剩下的都ln -s过来。
ycm_extra_conf.py文件的配置
1
2
cd ~
wget --no-check-certificate https://raw.githubusercontent.com/Valloric/ycmd/master/cpp/ycm/.ycm_extra_conf.py
这个文件是mvim打开时默认加载的语法配置文件。注意要修改里面的一些flag参数,以符合自己机器的环境。现在你打开一个main.cpp,已经可以提示代码完成了。
标准c语法支持
这步不是必须的,c开发的话最好有。因为mac下的libc似乎版本很奇怪。
先去llvm.org上下载对应平台的二进制包,解压到~/ycm_temp,里面有bin\lib\include等目录。
1
2
3
4
5
cd~
mkdir ycm_build
cd ycm_build

cmake -G "Unix Makefiles" -DPATH_TO_LLVM_ROOT=~/ycm_temp . ~/.vim/bundle/YouCompleteMe/third_party/ycmd/cpp
生成makefile文件后,执行:
完工!
细节配置项
vim ~/.vimrc
添加两行:
1
2
let g:ycm_confirm_extra_conf = 0
let g:syntastic_always_populate_loc_list = 1
第一行的意思是导入ycm配置不再需要手动确认。
vim ~/.ycm_extra_conf.py
在对应的位置,flags中,添加两行:
1
2
3
4
'-isystem',
'/Users/chenzhen/ycm_temp/lib',
'-isystem',
'/Users/chenzhen/ycm_temp/include',
改成自己电脑的目录。使用llvm的库。
这里-isystem一般是写第三方库的,有warning也不会显示,-I一般写自己的代码目录,有warning还是要显示的。
最好是在~/.ycm_extra_conf.py中定义好全局的,每个项目下放一个自己的。
快捷键
ctrl+I前进,ctrl+O后退。
给~/.vimrc添加内容:
1
2
3
4
5
6
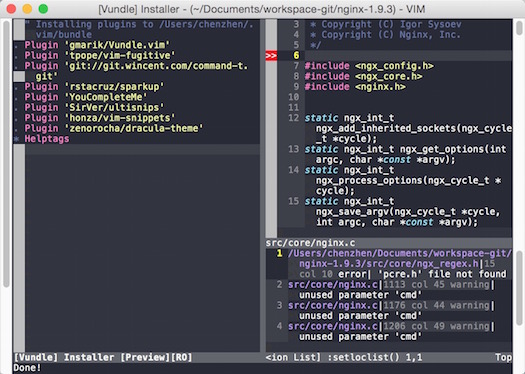
let g:ycm_error_symbol = '>>'
 let g:ycm_warning_symbol = '>*'
 nnoremap <leader>gl :YcmCompleter GoToDeclaration<CR>
 nnoremap <leader>gf :YcmCompleter GoToDefinition<CR>
 nnoremap <leader>gg :YcmCompleter GoToDefinitionElseDeclaration<CR>
 nmap <F4> :YcmDiags<CR>
能得到:
* >>表示行有错误
* >*表示行有警告
* gl gf gg就是找代码定义声明
* f4是打开编译窗口(fn+F4)
让配色cool一点
vim ~/.vimrc
添加内容:
1
Plugin 'zenorocha/dracula-theme', {'rtp': 'vim/'}
打开macvim,运行:PluginInstall。
再vim ~/.vimrc
添加内容:
1
2
syntax on
color Dracula
添加代码片断助手
vim ~/.vimrc
1
2
3
4
Plugin 'SirVer/ultisnips'
 Plugin 'honza/vim-snippets'
 let g:UltiSnipsExpandTrigger="<D-k>"
 let g:UltiSnipsEditSplit="vertical"
重新mvim进行运行:PluginInstall。关于代码片断功能,见https://github.com/SirVer/ultisnips%E3%80%82
command+k自动完成代码片断。比如写一个APACHE选中,按command+k自动就完成一片。
bbox command+k: 写一个大注释框框。
datetime command+k: 当前的时间。
如果出现打开nginx.c不能使用上c.snips里的定义,请确保.vimrc里的一行叫filetype plugin indent on的显示在所有plugin最后。
再给vim配一下tab用4空格代替等
vim ~/.vimrc
1
2
3
4
5
6
7
8
9
10
11
12
13
14
15
16
17
18
19
20
21
22
23
24
25
26
27
28
29
30
31
32
33
set scrolloff=3 " 2 lines from the bottom / top⋅
set number " Set line numbers⋅
set cursorline "Highlighted line
set autoread " Set to auto read when a file is changed from the outside
set ignorecase " Ignore case when searching
set smartcase " When searching try to be smart about cases⋅
set incsearch " Makes search act like search in modern browsers

set expandtab " Use spaces instead of tabs
set smarttab " Be smart when using tabs⋅

set shiftwidth=4 "Tab is 4 spaces wide
set softtabstop=4 "count 4 spaces as tab

set autoindent "Auto indent
set smartindent "Smart indent
set copyindent "Copy indent style
set wrap "Wrap lines
set linebreak "Wrap lines on net word

set backspace=2 " make backspace work like most other apps
set backspace=indent,eol,start " backspace fix


" Show a new line with >⋅
set showbreak=>\
"display tabs and trailing spaces
set list
set listchars=tab:▷⋅,trail:⋅,nbsp:⋅
set title " change the terminal's title
set visualbell " don't beep
set noerrorbells " don't beep
set laststatus=2 " Always show statusline
收工效果
想快点找到作者也可以到Twitter上留言:
@54chen 或者你懒得带梯子上墙,请到新浪微博:
@54chen